
Learning how to unscrew a shower drain in Prescott, AZ usually takes longer than it should because local mineral deposits lock the threads in place. The good news: with the right tool for your drain type and a little patience, most covers come free without a service call. This guide walks through drain identification, tools, removal steps, and what to do when the drain won't budge.
How to Identify Your Shower Drain Type
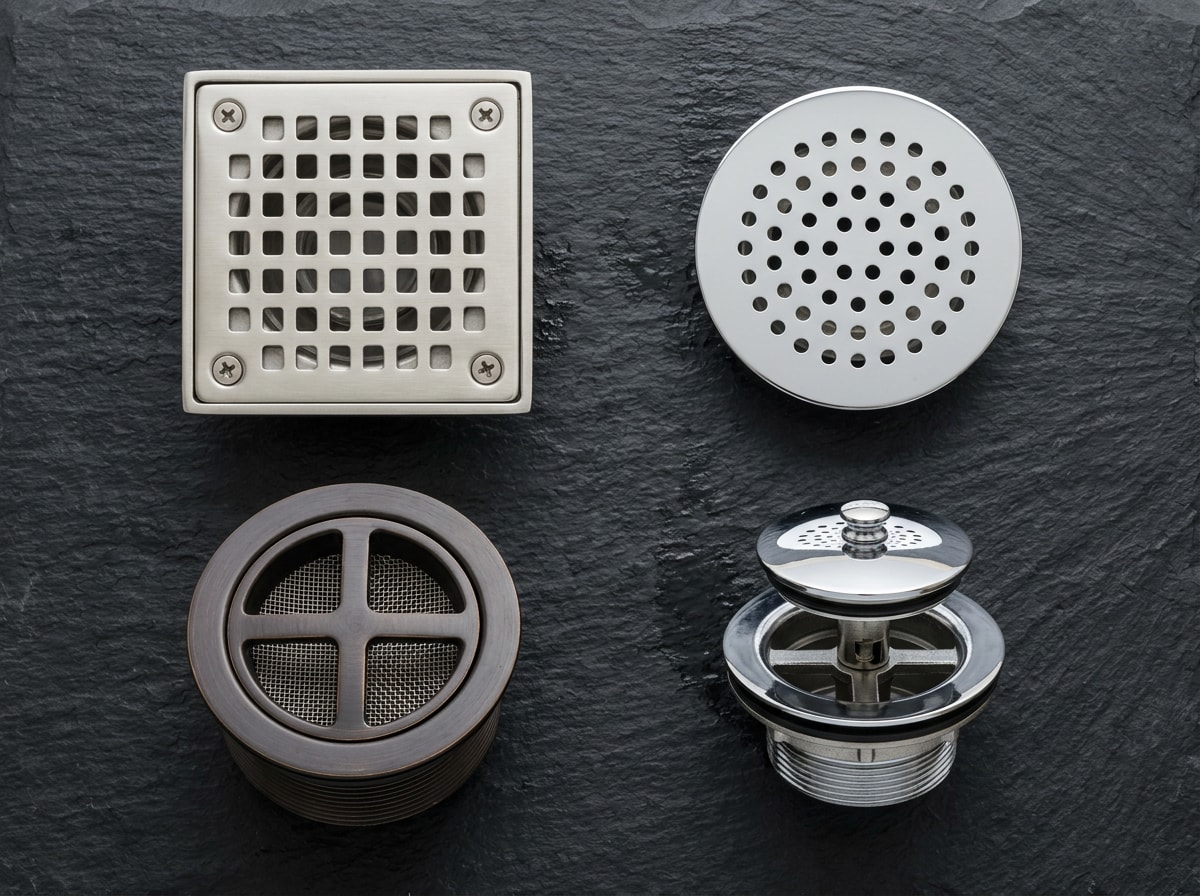
Spotting your drain style takes about ten seconds and determines which tool and motion you'll need.
- Screw-in drain: one or two visible screws in the cover's center or edges.
- Snap-in drain cover: flat and seamless, no visible fasteners, pops into a friction-fit ring.
- Threaded strainer: a crossbar or spoked pattern across the opening.
- Lift-and-turn drain (toe-touch stopper): a small knob you twist or press.
Shower drains with openings of two inches or smaller fall under the same federal plumbing hardware standard as other floor drains. Drains of outlet NPS-2 and smaller, intended only for installation in shower areas, are covered in this Standard and in ASME A112.18.2/CSA B125.2 as well. That standard, maintained by the American Society of Mechanical Engineers, is why most residential shower drains share the same basic thread pattern regardless of brand.
If you want a visual reference before you start, our walk-in shower drain plumbing diagram guide breaks down how the drain body connects to the trap below the pan.
Tools You'll Need to Unscrew a Shower Drain
Gather everything before you start so you're not dripping water across the bathroom floor mid-project.
- Flathead and Phillips screwdrivers
- Two pairs of needle-nose pliers
- Penetrating lubricant (WD-40 or similar)
- Work gloves
- A small container for loose screws
- A dedicated drain key, if you have a threaded strainer
Penetrating lubricant sprays are flammable aerosols, and federal workplace safety rules treat them as a fire and vapor hazard in enclosed spaces. Flammable aerosol shall mean a flammable aerosol as defined by Appendix B to § 1910.1200, and ventilation as specified in this section is for the prevention of fire and explosion. Crack a window or run the bathroom fan before spraying, and keep the can away from a water heater pilot light or any open flame, per OSHA's flammable liquids standard.
How to Unscrew a Shower Drain: Step-by-Step
Once you've identified your drain type and laid out your tools, the removal sequence is the same regardless of style.
Step 1: Clear the Drain First
Run water down the drain for a minute before touching a screwdriver. This shows how badly clogged the pipe is and lets you clear standing water before it spills across the shower pan when the cover comes loose.
Step 2: Remove the Drain Cover
| Drain Type | How to Spot It | Tool Needed | Turn Direction |
|---|---|---|---|
| Screw-in | Visible screws in cover | Screwdriver | Counterclockwise |
| Snap-in | Flat, seamless cover | Flathead screwdriver | Pry up, no turning |
| Threaded strainer | Crossbar/spokes | Drain key or pliers | Counterclockwise |
| Lift-and-turn | Center knob | Hands/pliers | Counterclockwise |
For a screw-in cover, back out the screws with the matching screwdriver and drop them in your container. A snap-in cover usually pries up with a flathead screwdriver wedged gently at the edge. For lift-and-turn stoppers, twist the knob counterclockwise while lifting. Threaded strainers typically need a drain key or two flathead screwdrivers braced against the crossbar, turned counterclockwise together.
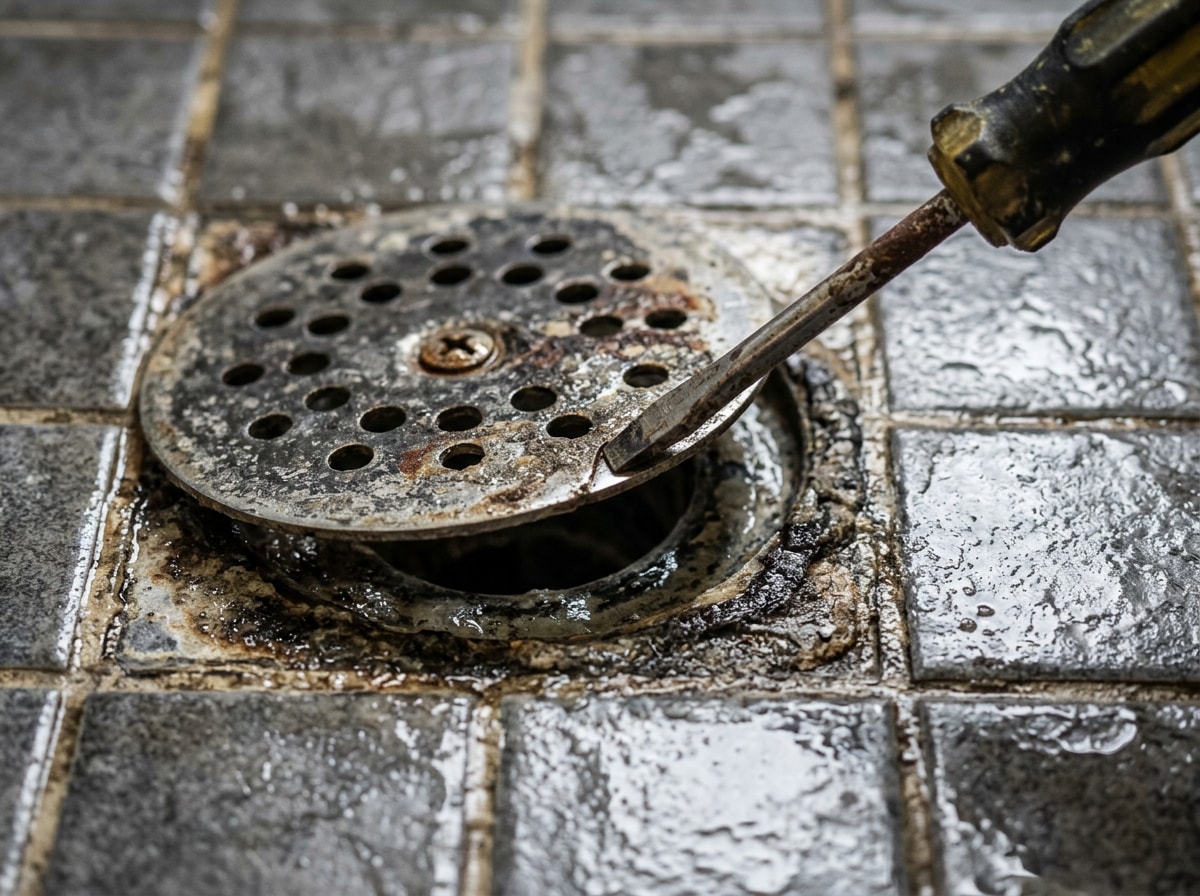
If the cover won't budge after a reasonable effort, stop before you crack the pan. A drain repair professional can get it loose without damaging the fixture.
Step 3: Loosen the Drain Body
Insert two pairs of needle-nose pliers into opposing openings in the drain body and turn counterclockwise together. A dedicated drain wrench reduces the odds of a pliers tip slipping and scratching the shower base, which matters most on acrylic or fiberglass pans. Don't force it. If the drain resists, reapply lubricant and give it a few more minutes instead of risking a cracked pan.
Step 4: Pull the Drain Out
Once loosened, grip the flange and pull it straight up and out. You'll likely find old plumber's putty or sealant residue around the base. Scrape this away with a putty knife before setting the old drain aside.
Step 5: Clean and Inspect
Clear hair, soap scum, and debris from the opening. A vinegar-and-baking-soda soak helps loosen mineral buildup clinging to the threads. While you're in there, check for cracks, rust, or worn threads so you're not making a second trip later.
Common Challenges and Troubleshooting
Stripped screw heads are the most common snag. Pressing a wide rubber band over the screw head before driving the screwdriver in adds grip. For a badly corroded screw, a screw extractor kit handles what a standard screwdriver can't.
Mineral-locked threads are the bigger issue around Prescott specifically. The City of Prescott's own water quality report classifies municipal water as moderately hard. The City's water is considered moderately hard, averaging 75 to 130 ppm, which equals 4.3 to 7.6 grains per gallon. Over months, that calcium and magnesium calcifies around drain threads and essentially glues the cover in place. Private wells outside the city system can run harder still, so homes in Prescott, AZ and the surrounding valleys sometimes need a longer lubricant soak than the ten-minute window that works in softer-water regions.
In my own service calls across Yavapai County, the drains that fight hardest are almost always original to the house and have never been removed for cleaning. A 15 to 20 minute soak with penetrating oil, repeated once if needed, beats brute force on an old cast-shower pan every time. If a drain still won't turn after two soak cycles, that's the point to stop and get a free estimate rather than risk cracking the pan or rounding the fitting past the point a wrench can grip.
About the Author
This guide was written with input from Dustin Elsea, owner of Elsea Plumbing INC and a Prescott-area native with over 30 years in the plumbing trade, holding Arizona ROC licenses 232301 and 232302. Dustin and his team handle drain repair, water heater, and septic calls throughout Prescott and the surrounding High Desert. Questions about a stuck or damaged drain? Contact Elsea Plumbing for a free estimate.
FAQ
Why would you need to unscrew a shower drain?
Common reasons include clearing a stubborn clog, replacing a cracked or outdated cover, cleaning out buildup causing odors, or accessing the pipe for a larger repair.
How do you unscrew a shower drain?
Turn the cover or strainer counterclockwise to loosen it, clockwise to tighten it. Hands alone usually aren't enough grip, so needle-nose pliers or a drain key typically do the job.
What if my shower drain cover won't unscrew?
Spray penetrating lubricant around the edges and threads, then wait 10 to 15 minutes before trying again. In Prescott's harder water, give it a second soak before switching tools.
Do I need special tools to remove a shower drain?
Most shower drains only need a screwdriver and possibly pliers. Threaded strainers are the exception; a dedicated drain key makes removal noticeably easier.
Which way do you turn a shower drain to loosen it?
Counterclockwise loosens almost every residential drain type. Clockwise is for tightening a new drain back in after cleaning or replacement.
Can I replace a shower drain myself?
A straightforward cover swap is a reasonable DIY job. Pulling the full drain body and resealing it against the pan is where a lot of homeowners run into trouble, since a bad seal means a leak into the subfloor. If you're not confident after reading the steps above, a licensed plumber can finish it in less time than a second failed attempt.